From time to time I check the local craigslist bike ads for cheap used bikes. I enjoy taking them on as projects; something about sitting in front of a computer spreadsheet all day makes me want to come home and build something with my hands. So I saw an ad for a $30 bridgestone kabuki and I went to pick it up. The guy I emailed said it would likely be “a project”. He wasn’t kidding…other than the frame the components were rusted hard. But the frame was in good shape and it was about my size and the dude was about my height so I took it. Negotiated it down to $25. I think he was the sole owner since as I was running out the door he gave me the original owner’s manual. He also tried to interest me in a 1980’s Camaro, but I said no thanks and he went back into his house. This is what I brought home, it was a bridgestone kabuki super speed 12.


Not exactly lovingly cared for. The leaves stuck in the rear wheel were further proof (in addition to the copious rust) that this was likely stored at best in a shed on the ground. But there was one thing that stood out on the frame:

Coolest headbadge I think I’ve ever seen.
Most importantly the frame was sturdy (somewhat heavy high tensile) steel with only minor dings on it so I decided to proceed with a single speed conversion for a few reasons:
- The existing wheels were an abomination. Luckily I had a spare Ukai road wheelset from a League Fuji I had many years ago. It was a freewheel, so I’d need to figure out how to take it off but the research I did online looked like it would be straightforward. I’d only converted to singlespeed a freehub splined cassette before so doing a freewheel one would be a first for me.
- I didn’t want to drop more than say another $100 on parts. I did have a spare seat, cables and housing and a variety of tools (bike-specific and otherwise). The brakes that came with the bike, although some bolt heads were rusty, seemed fairly functional so I thought I could re-use those. Also, the crankset other than some surface rust which I could scrub off with some OO steelwool and WD-40, looked ok.
- I felt after doing some research online I felt I could handle the conversion.
By the way, the user’s manual the dude gave me was essentially useless:


First thing to do was to strip this thing down as far as it could go. Successfully took off the derailleurs, wheels, chain and brakes.


Wd-40 to the rescue on those. Ran into a couple problems after this though. I wanted to do a 42:16 ratio but could not remove the big ring, even after taking off all the ring nuts. So I tried taking off the crank and it had seized onto the hub axle. So I had to resolve to using the 52 big ring and I hacksawed the 42 ring off.

Next issue was the seatpost. I came to find out that this was a quill seatpost, which was new to me but the problem was that it too had seized into the seat tube. Saw articles online that this was likely due to the steel frame and aluminum post galvanizing together over time due to the neglect. Critical juncture: I had to sit on the bike and glide around to see if it was ok to leave the seat height as is. I knew this wasn’t going to be a racing bike; it would be more of an around the town/train station commuter/to the beach bike. So it felt good (tip toes on the ground as I sat on it) although another inch of higher seatpost would have been nice. I did read that you could pour some boiling water/ammonia down the tube to see if it could come loose. But I could live with this and decided to keep going.

I ordered a bunch of parts:
- shimano 17t bmx freewheel.
- park fr-1 freewheel remover tool
- freewheel spacers from loosescrews.com. all the other parts came via amazon.
- sram singlespeed chain with powerlink
- lycra seat cover for a nashbar seat that had a rough grippy surface
- handlebar tape
I should probably mention some of the websites I used for educating myself:
While I waited for the parts to come in, I cleaned the handlebar which had a thin layer of old handlebar tape residue all over it. I used copious amounts of goof-off and a metal flexible putty knife. Took a lot of elbow grease to get it to this condition:

Note that I took off the horizontal levers and just left the dropout levers, these were the original ones on the bike and were in decent shape.
Parts started to come in.

Of course the tool I wanted in my hands first (the freewheel removal tool) would come in last.
In the meantime I tinkered with the brakes. I actually hacksawed the rear reflector post since it appeared to be a support for the rear brake.

Finally the freewheel remover tool came in. I successfully took off the freewheel from the old ukai wheel I had and adjusted the hub. Then I screwed on the bmx single speed freewheel to check the alignment.

It was a bit off, which is what I was expecting. I just eyeballed it from this angle:

By the way, I decided to go with a good capped quick release skewer on tight in lieu of a nutted axle based on Sheldon Brown’s advice, even with the semi-horizontal dropouts.
But now I had to remove the bmx freewheel to add the spacers…problem. I had a fr-1 tool but now needed a 4-notch shimano bmx single speed freewheel remover tool. I had to order that. When it came in, I took off the freewheel and added two 2mm and one 1mm freewheel spacers on the spoke side, which is the photo below. I probably could have used another one to make it ideal alignment but I felt like I was running out of freewheel hub thread to put the freewheel on.

I cut the cables and housings and adjusted the brakes. The rear brake feels a bit mushy but the front seems to respond better. The lycra seat cover worked out well.

Next, I put on the handlebar tape. Had to watch the video above a few of times, but it helped.

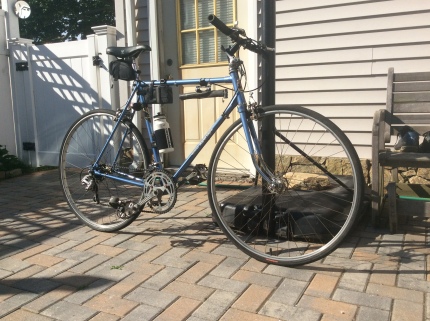
Finished product below. Will take some more pictures outside once I take it for an extended ride. On the test runs, it felt pretty good. The 52:17 is a bit of a challenge but once you get going it motors. Maybe I’ll get a 20t in the future. And it’s fairly light; I think I saved 10- pounds alone from the original wheel set.


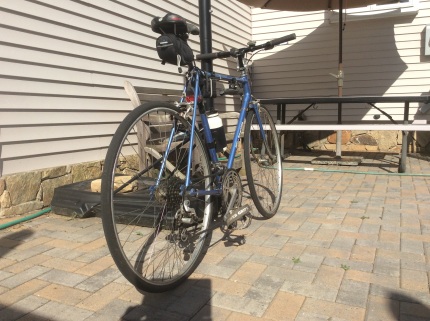 I was able to scrounge parts scavenged from other miscellaneous bikes. No-name riser quill stem and brake levers probably from an old department store mountain bike, and an avenir flat mountain bike handlebar from my Gary fisher Hoo Koo E Koo gave me a much more comfortable position on he bike. Also got rid of The Time pedals since one of them had loose clip springs and I went with flat mountain pedals with power grip pedal straps which I love. Then I got a little more creative with the frame accessories since this bike doesn’t have mounting Allen bolts in the main frame triangle.


